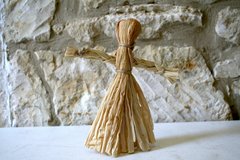
Make your own corn husk doll! Even if parents of pioneer children had spare money to spend on toys, it would have been a difficult task to find a store selling such things. However, this did not keep children from play - they simply made their own toys! Follow this step-by-step tutorial to make a corn husk doll of your own.
Make a Historical Toy
Materials Needed

- Corn husks
- Bucket of water
- String or twine
- Scissors
Instructions
- Soak corn husks - Before beginning, soak corn husks in a bucket of water until they are soft and pliable.
- Divide husks - Use 3-4 corn husks per doll, depending upon the size and thickness.
- Gather and pinch - Gather and pinch together the ends of three or four corn husks about 1 inch from the end.
- Tie together - Use a piece of string or twine about 5 inches long to tie the husks together with a double knot. Trim the string ends.
- Flip the bundle - Flip the “bundle” of corn husks upside down and pull the long ends down over the knot, covering it completely.
- Form the head - Gather the husks over the knot and tie with another piece of string to form the head. Trim the string ends.
- Form the arms - Take another corn husk and rip it into three strips.
- Tie together - Tie the three strips together about an inch from the end with a double knot. Trim the string ends.
- Braid the arms - Braid the three strips and tie the opposite end - forming the arms for the doll. Trim the string ends.
- Bring the arms and body together - Place the arms inside the doll, up underneath the head, dividing the loose husks of the body into two sections.
- Form the waist - Gather the two sections of husks under the arms and tie to form the waist of the doll. Trim the string ends.
- Trim hands and skirt - With scissors, trim the hands and skirt, creating a straight edge so that the doll can stand upright.
- Boy doll option - If making a boy doll, divide the skirt into two sections and tie the ends to create legs. Trim the string ends.
- Enjoy your corn husk doll! - Feel free to be creative once you have mastered the basic doll.
Download the Guide
Download a fully illustrated printed version of this activity guide to use as a worksheet with your class.
